
Getting Started With Bikepacking
So, you want to get started in the wonderful world of bikepacking? Maybe you’ve seen some folks out and about with their bikes all kitted out with bags and gear, or maybe you’ve seen videos from the likes of genosack or other folks in the community? Hopefully by the end of this, you will have a good idea of the things you’ll need for bikepacking, as well as how to plan your first route!
Disclaimer: Everyone has a different name for riding a bike loaded up with stuff: bikepacking, bike touring, cycle touring, dirt touring, bicycle camping, credit card bike packing, etcetera. Throughout this article, for sake of continuity, I will simply refer to it as bikepacking.
From a distance, cycling in it of itself can seem like an activity for folks with deep pockets, not the masses. I know when I started, I felt this way, but I quickly realized that this could not be further from the truth. I have learned from my years of cycling that you really don’t need the fanciest of bikes to do anything. For a lot of my cycling career, I have ridden bikes that were built in the 70s and 80s, with a mix of new and used parts. These bikes for the most part are ones anyone could pick up at their local bike co-op or classifieds starting at around $100. For the first 4 or 5 years where I began to take the sport seriously, these bikes took me everywhere. With bikepacking the same is true, old bikes, when paired with a bit of mechanical knowledge, can be the best way to get yourself out there having fun. The mechanical knowledge tidbit is an important one, because what you save in cost with older bikes, you often pay for in convenience and maintenance. For instance, most of my bikes now, all of which I use for bikepacking in some capacity, have tubeless tires, a system that does away with an inner tube and relies on air pressure, rim shape, and tire sealant to keep you rolling. This system allows for exponentially greater puncture protection, as well as a more comfortable ride. On older bikes, in most cases, you will be running a traditional tube and tire set up, where you have an inner tube inside a tire acting as your bikes rolling support. This system has worked well for almost 200 years, but if you plan on riding on roads where debris is likely (most American roads), dirt roads or trails, you will get many more flats than a tubeless system. This is just 1 example of this convenience paradigm in regard to bike choice, but do not let this dissuade you. I and others I know have absolutely rallied our 1980’s 26er mountain bikes on things some wouldn’t ride a full suspension mountain bike on, and we have all survived to tell the tale. Don’t let cost be something that dissuades you from participating in this amazing sport, as you really can make almost any bike a bikepacking bike, you just have to decide what you’re willing to sacrifice to do so.
Throughout this, I am going to do my best to keep things approachable in terms of cost, technical know-how, and difficulty, all in effort to make this bit of literature useful for anyone interested. This guide will hopefully equip you with all the knowledge and skills you will need to conquer your first bikepacking trip. This will be broken up into five sections: Bike Choice and Build, Essential Skills, Cargo, Food and Route Planning. These sections when completed in order allow for you to create a good bike knowledge baseline before you get into the more bike-camping portion, which I believe to be paramount to your trip’s success. I hope this tool is a helpful one, and if you have any specific questions regarding your first trip, feel free to reach out.
Bike Choice and Build
This section will by no means be a complete guide to everything you should look for when buying the bike that’s right for you. Instead, I am going to use two examples of bikes that I have built up, one being a bike I built up for my good friend Chad that he uses as a gravel and bikepacking bike, and a bike built for my brother he uses for commuting and bikepacking. These two bikes are very different but essentially serve the same purpose; a bike that is comfy on the roads and can handle some dirt.
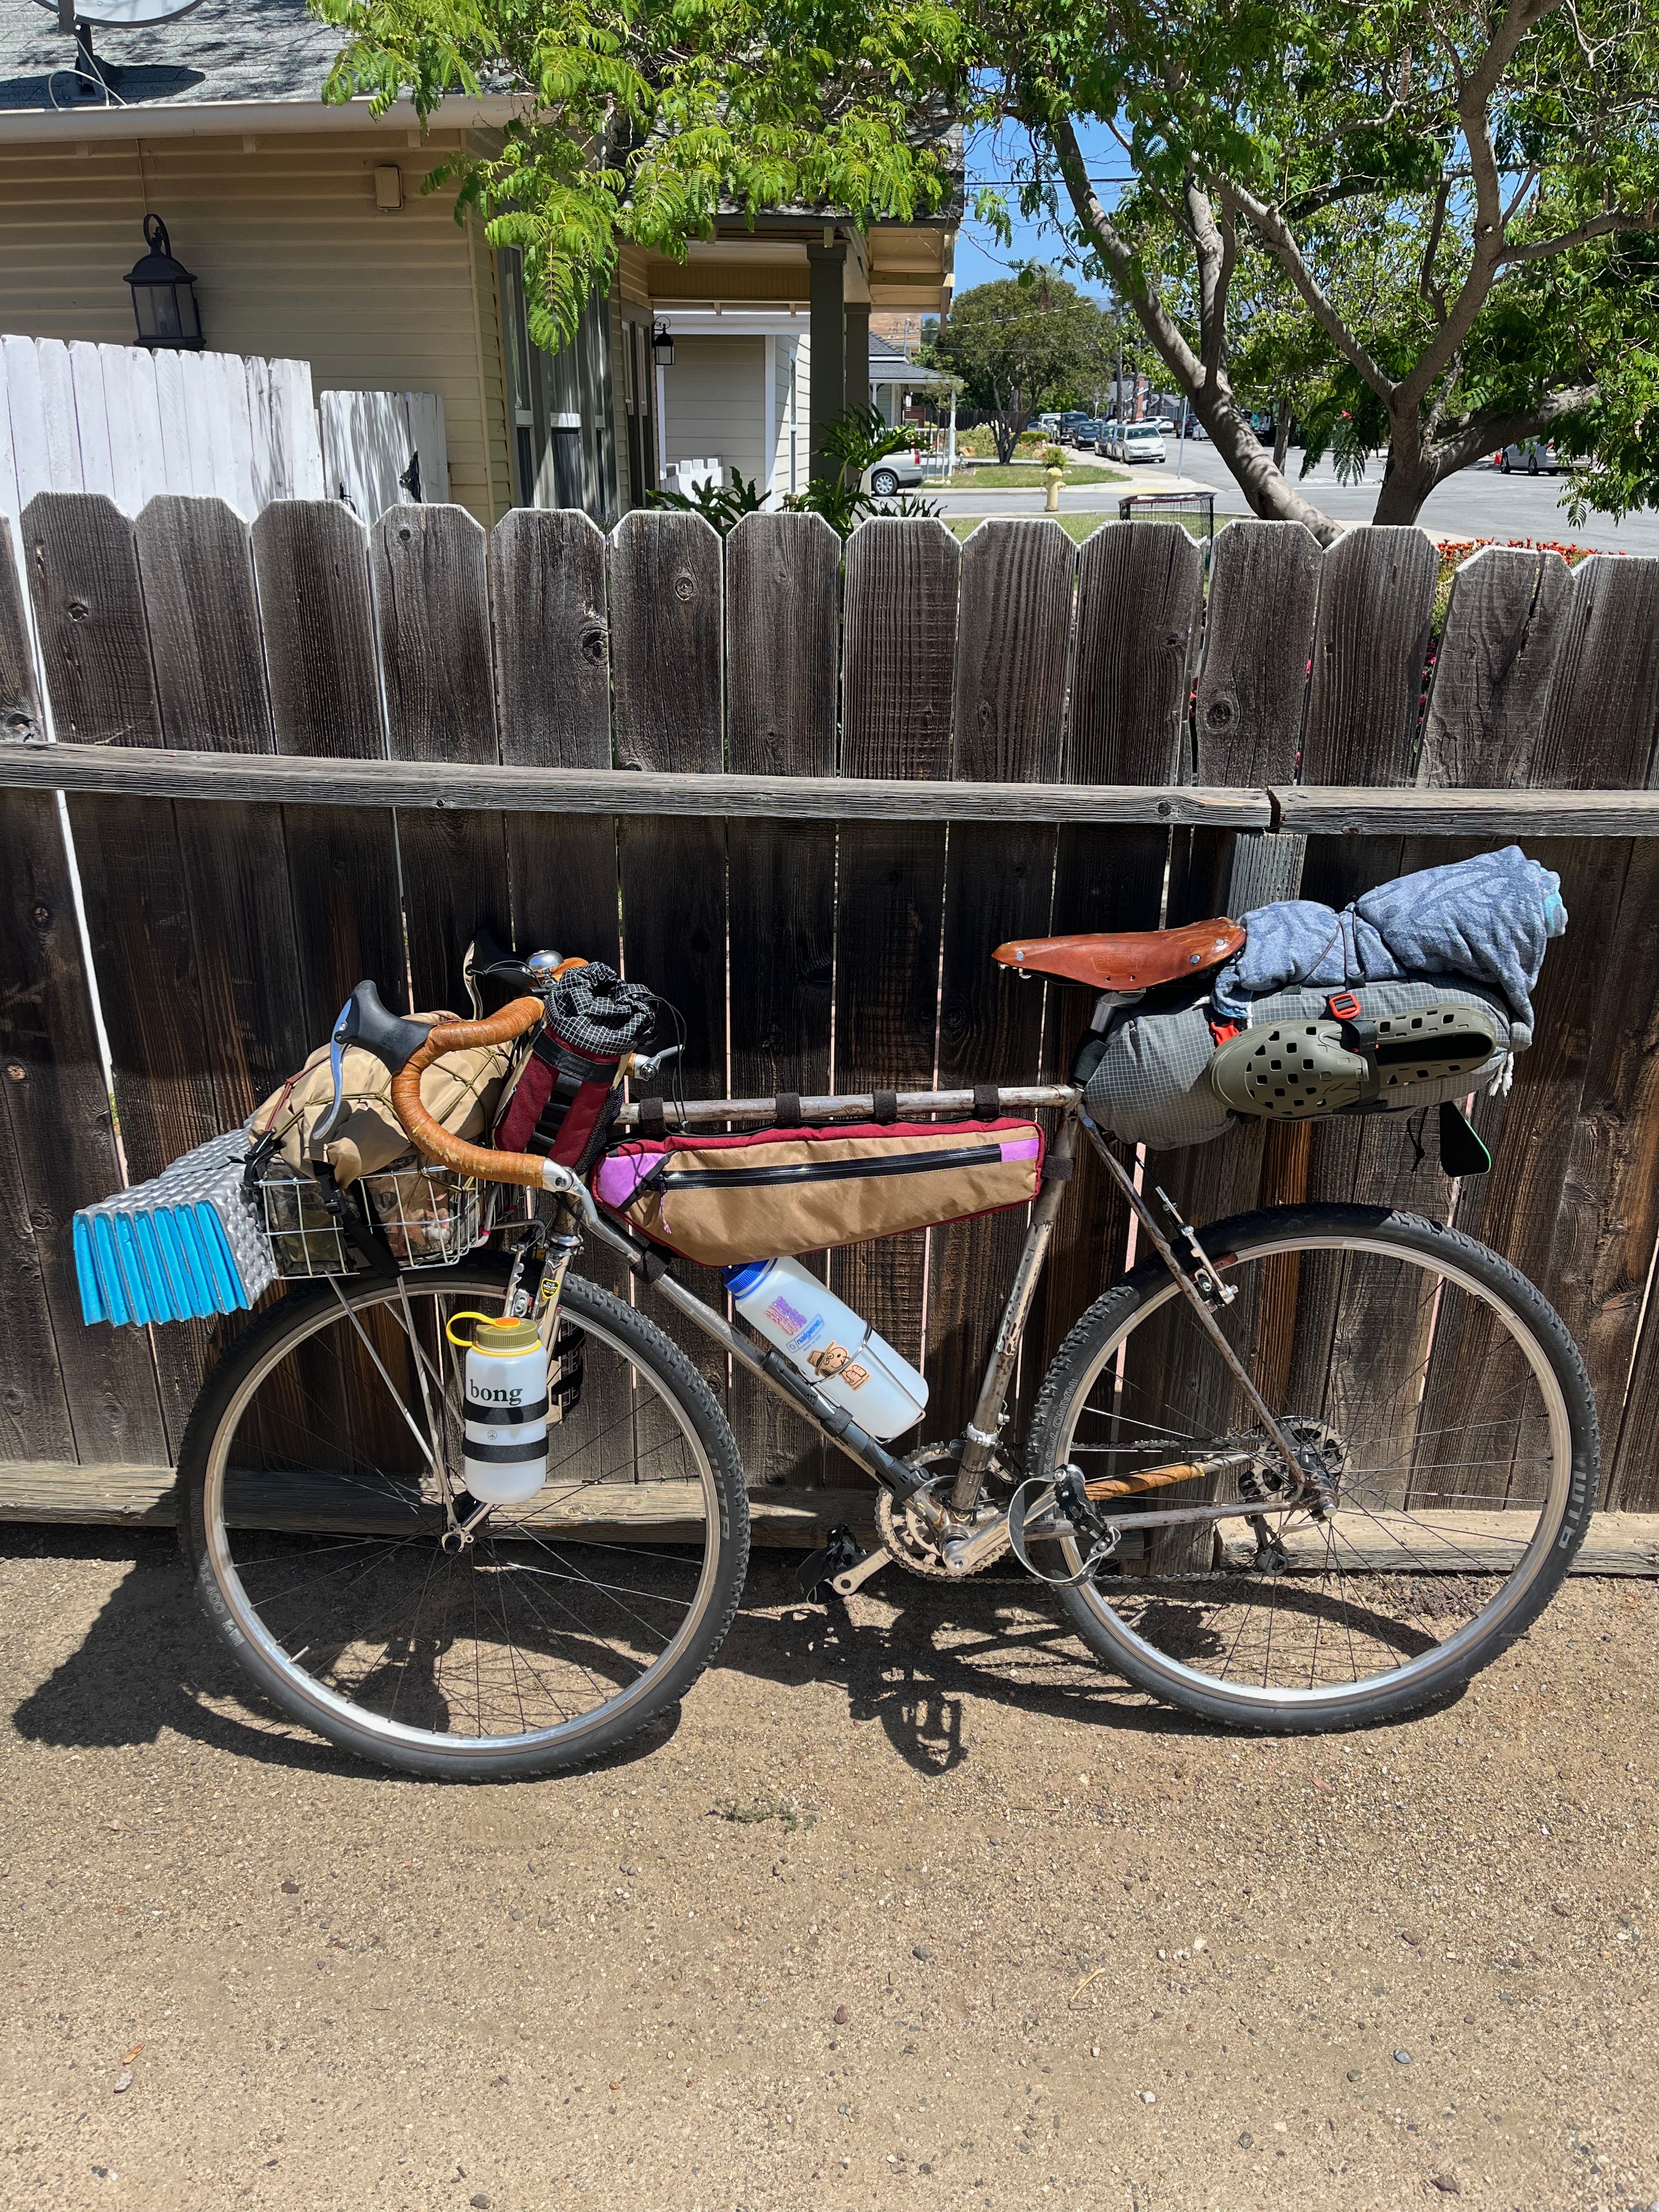
Chad’s 1984 Specialized Rockhopper
Chad pictured above in the La Panza’s with his rockhopper loaded up with some loaner bags from me for a very chilly overnighter in January of 2025.
Unfortunately, I don’t have any pictures of this bike pre-pimping, but it essentially started as a bone stock 1984 Specialized rockhopper size 22 (A rare find for us tall fellas). This bike had a 3x drivetrain that was not in the best of shape, decaying plastic cantilever brakes, and some parts that would not make it the most ideal for Chad’s purposes. The nice thing about older steel 26” bikes is that there is a ridiculous amount of them floating around. These bikes were built to last, and if they were properly stored can last a lifetime. The frames are dead simple, and for a first bike, they make an excellent option for someone looking to learn the ins and outs of a bike. I want to re-emphasize, this is not necessarily a guide for building up your own bike, but simply an example of one that has worked well.
For the build I recommended a simple and relatively affordable friction-shifted 1x Microshift advent drivetrain to allow for a bit more simplicity as well as a bit more reliability. The friction shifted drivetrain conversation is one I don’t want to get too into in this write up, but in my opinion they are wonderful tools for vintage bike conversions. In the event of a fall or bike tip over where your derailleur hanger is bent, a friction shifter will allow you to find a few gears to get you back to where you started, or somewhere where you can make more significant repairs. Along with the drivetrain we added some new drop bar levers as well as Mini-V brakes to replace the cantilever brakes. Mini V brakes with some nice Kool Stop pads are one of the best upgrades you can make on these bikes as they increase the braking power and make the bike feel much more confidence inspiring when loaded up. These two changes allowed for this bike to ride wonderfully, and more importantly, safely and reliably. Here I attached a spreadsheet showing the parts and cost at the time of purchase for this build as well as a video of Chad riding his bike during the aforementioned trip.
Max’s 1980s Nishiki Mountain Project
This bike serves as a great example of a perfect first build that requires only a little bit of tinkering. When I this particular bicycle fell into my hands, It looked almost exactly like it does in the picture above. My brother Max needed a college commuter that could also be used as a bikepacking bike, and I knew this would fit the bill right off the bat. I decided to change only the touch points on this bike; cockpit, pedals and seat. Here I attached a spreadsheet for the parts I used on this build and the cost at the time of Purchase.
Essential Skills
Let’s say you are in the lucky position to be accompanied by someone on a bikepacking trip who happens to be skilled at bike maintenance. This is a common instance, and when leaned on too heavily, it can cause more harm than good. While bikepacking, heck even just cycling, trust me, you want to be self-sufficient to a certain degree. Learning the basics allows for some flexibility in our riding so that if, let’s say, you get a flat a mile back form a friend on a climb, you don’t have to burden your friend by having them come all the way back to you to fix the issue. Knowing a few bits of maintenance will improve all aspects of your riding and build some additional confidence when it comes to your connection to your bike. My goal with this section is to look back on the things that I have run into while bikepacking and address them through preparatory measures. Similar to the Bike Choice and Build section, this will by no means be a complete guide to bike maintenance, it will be a starting point for you to begin your research and preparation.
Flat Tires
The first mechanical I and anyone else you ask will mention are flat tires. Flat tires are ubiquitous in the world of bikepacking, and without proper preparation, they can be a huge pain in the ass. This problem is especially apparent if you are running tubes instead of tubeless tires, as the weight of all of your things on the bike makes those glass piles and goat heads even more difficult to avoid. An old-timer in the bikepacking community has told me stories of his crew touring the United States in the 80s and 90s and how every night around the fire they would all be patching their tubes from the day’s flats. Back then, and today, flats are a necessary evil in bikepacking, and I can promise you that on any trip longer than 1 day, you, your friends, or both will get a flat. Before you leave on a trip of any duration, deflate your tire and practice replacing the tube, as this practice will prove helpful when you are sweaty and angry on the side of the road or trail. So with that, let’s prep your flat kit!
The first piece of any flat kit is a tube. If you are running tubeless, 1 tube is typically all I go through in a trip, as long as I carry a Dynaplug tubeless plug kit or a similar product for quick flat fixes on the fly. For most of you reading this who I can guess will be running tubed tires, my general rule is to bring at least 3 extra tubes accompanied by a vulcanizing flat kit and a set of tire levers. My personal favorite patch kit is the Park Tool VP-1C due to its small form factor, proven durability, and nice carrying case. For tire levers only buy Pedro’s if possible as they almost never break. Pair these things with a good-sized and good-quality hand pump and you are good to go.
Disclaimer: I cannot emphasize enough that you need to practice using this kit. I have had friends go to use their pumps only to realize that they are Presta only and they have a Schrader valve or vice versa. These mix ups can cost you days of a trip or even the whole thing, so take the time to figure things out beforehand.
Replacing Cables, and Adjusting Shifting/Brakes
This fix is one that isn’t as common, but if it happens during a trip, it’s something that can end a trip very quickly. With some preparation and practice, a premature ending to your trip can be avoided through carrying a few coiled-up cables and having the knowledge of how to replace a brake or shift cable.
With replacing cables, comes the important and somewhat daunting task of adjusting brakes and you’re shifting. If you have a simpler, friction shifted bike similar to the builds I described above, this is quite easy. Starting from the shifter in the bottomed-out position, as well as the barrel adjuster (if present) almost all the way inboard, you insert a cable until it meets up with the derailleur and tighten the captive bolt to secure the cable under light tension. From here you should be able to shift through the gears easily, and almost no adjustment is required. Brakes are a bit more finicky, and I don’t think words can quite do the activity justice, so here I attached a video for you to identify what type of brake you have which will allow you to find specific guides. I highly recommend the Park Tool videos as they are very thorough.
Cargo
Now to my favorite part of the bikepacking setup, how to carry all of your things! If I’m honest, bags were one of the reasons I got into bikepacking, I loved how the look, function and feel, and nowadays I have found a love for making them. If you are a crafty person or have any interest in sewing, I encourage you to explore the ridiculous number of resources within the Make Your Own Gear or MYOG community. I want to make a very clear point, none of these methods for carrying all of your stuff is the right or best way to do it, it is just how I have personally done it. I have personally strapped my sleep kit, a tent, and some gear to baskets and racks on some of my first “touring” bikes and been just fine. All I want to provide in this section is some solutions that may work for your gear, and to start the decision process for how you’re going to get this done. For a more specific and in-depth breakdown of my gear, you can reference either my master gear list. Both of these may offer you some specific advice on what I am using currently.
Unfortunately, I don’t have much documentation of my first bikepacking trips and setups, but luckily, I remember them in extreme detail. The first setups I want to describe are the various iterations of loading I devised for my 1970-something Raleigh. This bike has taken me on thousands of bikepacking miles, from coast tours to some rather sketchy dirt tours, and it has seen more iterations of setup and gear than any of my present bikes.
Excuse the cardinal sin of the non-drive side image here, but this is what I could find. The setup pictured here was used for what I remember to be a 1 night bikepacking trip through in the Los Padres in May of 2022. It was on this trip where I met one of my best friends and best riding partner, Drew Taylor, so it is particularly memorable for me. I remember being super stoked for this trip, as I had just finished a roll top basket bag for my Wald 137 basket, and it worked wonderfully on this trip. In the basket bag I had some clothes, food, and my camera. Strapped to the front of the basket with 2 voile straps was my Therma rest z-lite. Throughout my time exploiting the outdoors I have experienced a long pattern of hating and loving inflatable mats. Currently, at the time of writing this article, I have mostly been using a nemo tensor insulated for almost all of my trips, and fingers crossed (I know this will bite me in the ass) I have had good luck with it for the past 2 years. In the feed bags up front I had some snacks, and my burrito that I would be eating later on that evening. I cannot remember what I had in the frame bag, but there was definitely something in there I had my sleeping quilt in the back along with a warm jacket and a blanket for ground cover. I also brough my crocs for some reason, but I think I may have switched out the pedals for clips before leaving. The running theme for this bike is non-optimized excess, but I can’t blame myself. At the time I didn’t have enough experience with what I did and did not need, and I didn’t know any better, so everything was sunshine and rainbows for my smiley self.
If you are looking at this setup and thinking, wow, I have a bike that looks like that, and I think a could match this setup, I have a few key things I would adjust. First, I would try to optimize the frame space a bit better, whether that be with storing something else on a cargo cage inside it or just utilizing the space a bit more. Second, I would try to balance the weight a bit, as older bikes like this have a fair bit of steering flop, so putting the weight a bit more rearward helps when you’re climbing or descending. Other than that, this setup was great, and if I was to take this bike on a trip again, I would load it similarly, just much lighter.
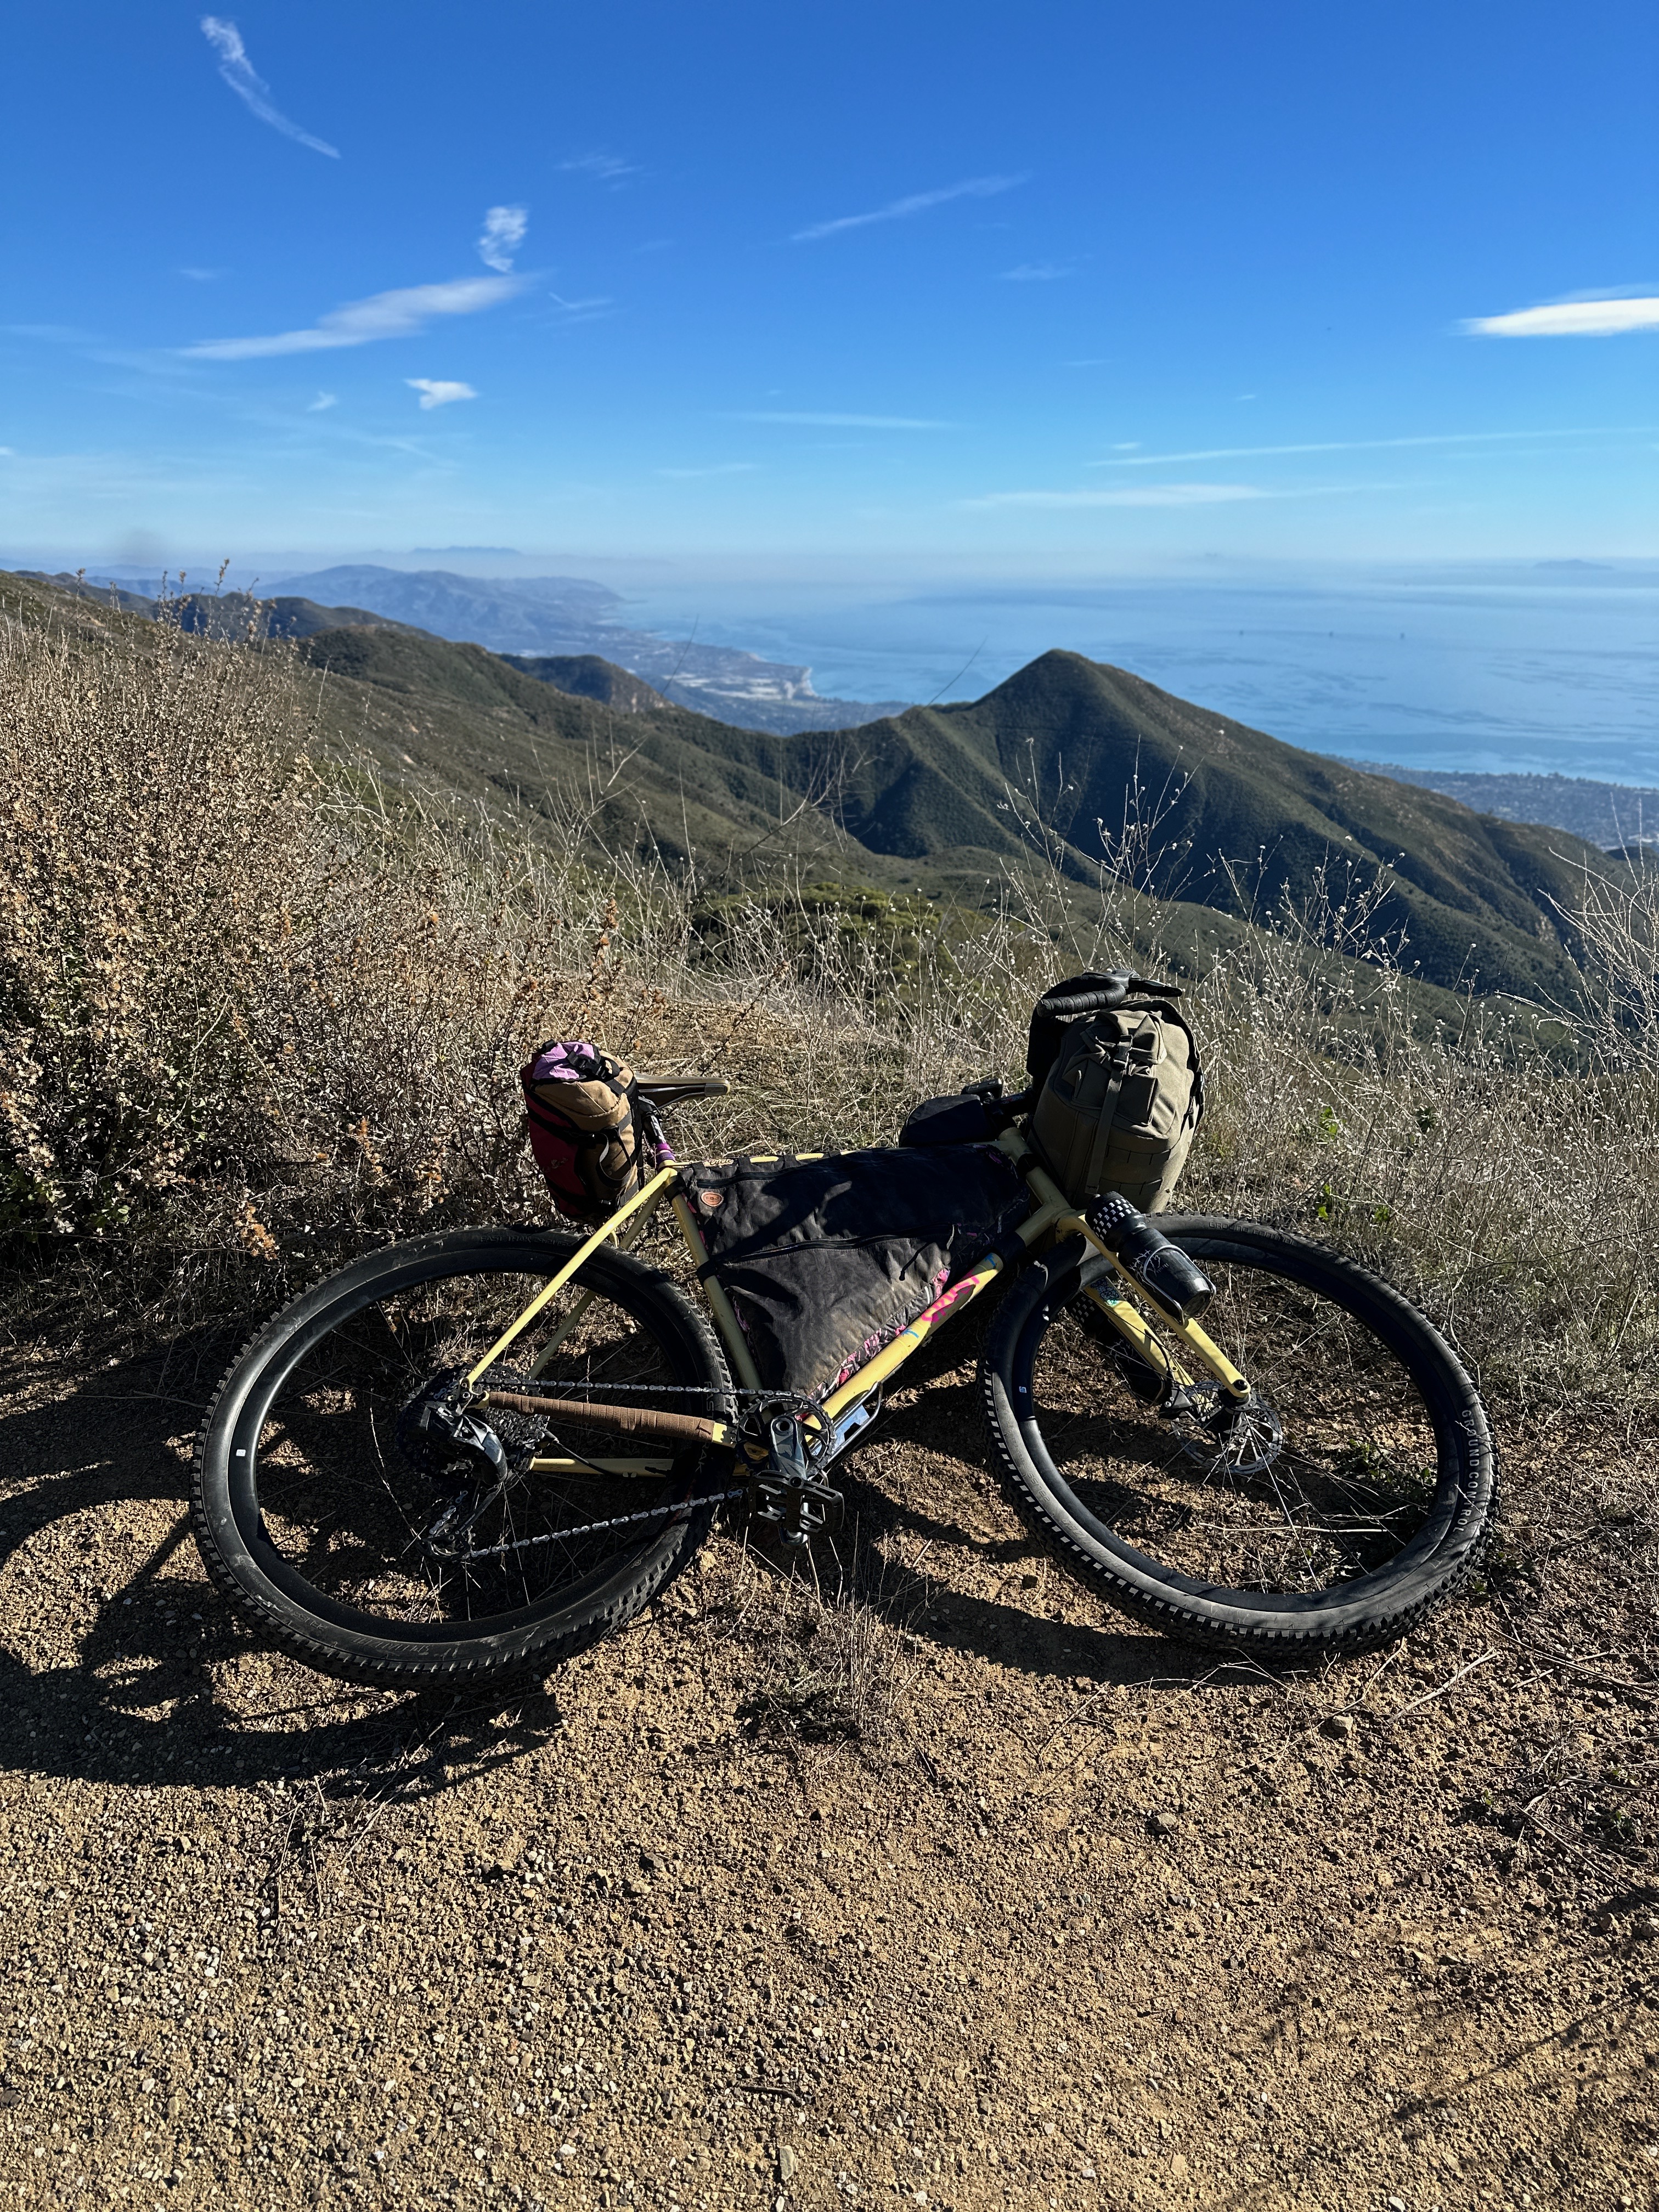
I won’t get into this one too much, but I wanted to share as this bike serves as my do-it-all bikepacking bike to some degree. This is the bike that I grab when a trip calls for some road, some gravel, and maybe some very light singletrack. I have it set up here with a classic, long-flap style rear bag which on this trip housed my quilt, bivy, and down jacket. In the frame bag I had my flat kit, some food, and some miscellaneous comfort items for this particularly posh evening of camping at some hot springs. The front bag was stuffed with some clothes, beer, and a towel. This bike has what is considered a “light-touring” frame, which basically means is does away with the stiffer and thicker-wall steel tubing and opts for a lighter tube set, which with the right load, makes it a very comfortable ride. I try to tell people that if you want a do-it-all bikepacking rig, and you have a sizeable budget, a gravel-ish bike is a great avenue. It offers comfort, many hand positions, and tons of space for your stuff, it just requires a bit more persuasion and body English down the rough stuff. Fine by me.
Linked here is a video where Drew and I break down our bike setups for a 300-mile race with 40k of elevation with a mix of road, dirt road, and single-track riding. This will give you some idea of what we like to bring, and how we set up our bikes.
Linked here is a breakdown of my hardtail setup for Tour De Los Padres in 2024. This may give you an idea of what I pack gear-wise for a backcountry-focused ride.
Food
The thing about bikepacking is that you do not need to be the best or strongest rider to enjoy yourself, or in the case of ultra-distance bike pack racing, win. Bikepacking is more of an eating competition than anything else, the more you eat, the better you will ride, and the better you will feel. The make-or-break factor on every trip I have been on, especially when things go poorly, is when someone doesn’t eat right, or enough. Eating or the lack of it has made way for some pretty interesting moments for my friends and I in the backcountry, and it is extremely important to stay on top of it. I am a little reluctant to write this, as I am not a nutritionist, dietician, or coach, but I am going to write this simply from a place of personal experience.
Like I said earlier, the first and most important thing to keep in mind is to start eating early and continue doing so throughout the duration of your ride. Take a break, eat something. Starting a hard climb, eat something. Getting off your bike to hike it, eat something. Taking a pee, heck, eat something! Following this rule has only led me to success during my time in the saddle. Even if you’re eating is just a bite or so, keeping your stomach and body accustomed to eating goes a long way. I, along with some friends have had the unfortunate reality when a lack of eating during the day makes dinner or even a lunch very difficult to eat and digest. Again, I’m no doctor, but something about the continuous steam of food seems to help most if not everyone I know, so there must be something to it.
Here are some of my favorite on-the-bike snacks to eat while bikepacking.
- More bars than you think you’ll need (you will need them)
- Candy (any variety, I like to bring gummies and chocolate)
- Dried fruit (mango is a personal favorite)
- Trail Mix (any variety)
- Cheese (hard cheeses are an incredible mid ride snack, don’t be scared.)
- Chips (any variety)
- Gels or sport chews (if this is something you like, the caffeinated ones can help a ton in the case of a bonk)
For me, eating at the end of the day is one of my favorite things to look forward to during a bikepacking trip. There is something about the activity that makes anything you eat taste like the greatest food you’ve had. For me, I love to bring some chips that I save for dinner, and some chocolate or a baked good or two for dessert. For the main course I have a staple that has been steadfast for over 5 years, the humble burrito. This is not the only option; I just want to share what I love to eat. Below are the ingredients for my favorite camp burrito. Cheap, easy, and tasty.
- 1 cup of dehydrated black or pinto beans
- 1 cup of instant rice
- ½ cup of nutritional yeast
- ¼ cup Dehydrated soup vegetables
- Tortillas
- Mini hot sauce bottle (secret weapon)
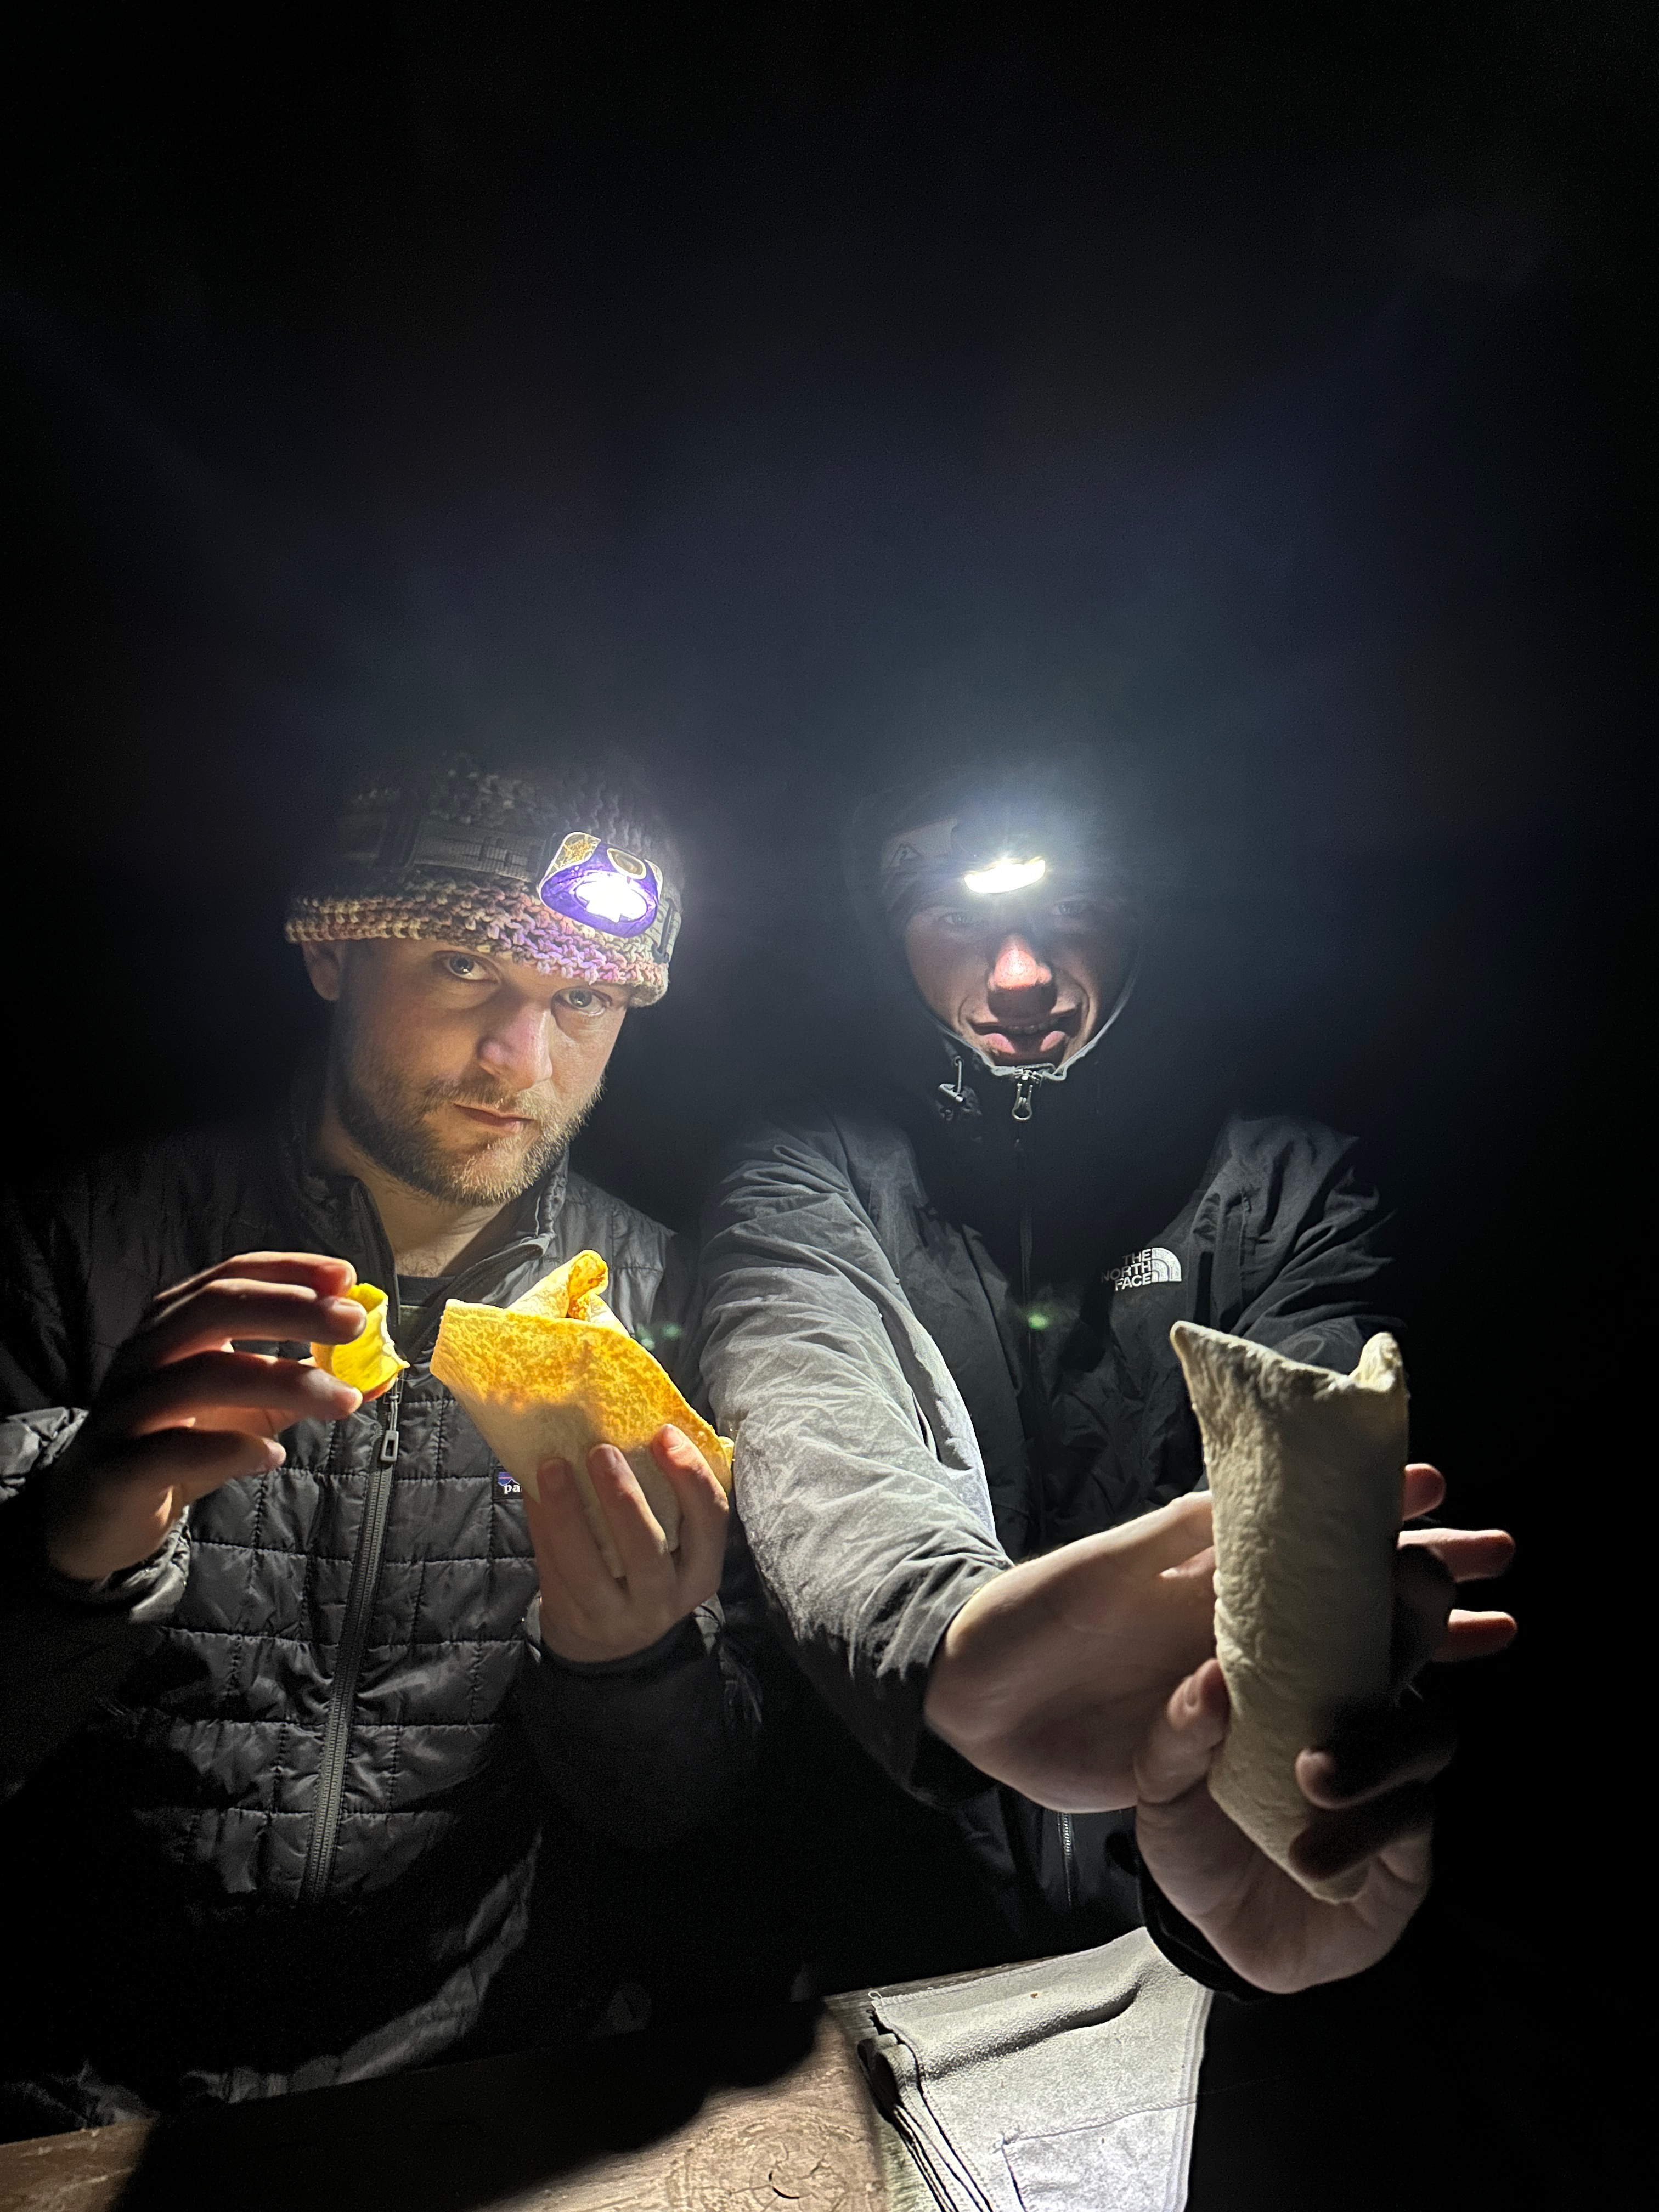
Just look at these boys, so excited to chow down on their burritos after a day of riding.
Route Planning
Route planning is an extremely important part of the bikepacking trip planning process. When I say planning, I don’t mean the simple “We are going to ride from point A to point B.” Instead, I encourage you to be a bit more diligent in your planning process. Taking the few extra minutes before a trip to plan out things like water stops, food stops, and backup camping spots helps a ton when you’re out on the bike, tired, and not in a decision-making headspace.
The first thing I like to look for when planning out a route is camping. Before a trip, you should have some idea of how far you think you’ll be able to ride per day, which will allow for some easy stop planning during your trip. For instance, if you are confident that you can ride 40ish miles a day on your loaded bike, you should plan your route around camping every 40 or so miles. Use this as a baseline, as maybe one day you’ll ride 30, but one day you may ride 50. The baseline mileage just allows you to have the peace of mind that you’re not going to be burning out.
The next thing I like to look at is water and food stops. For more road-oriented rides, this topic isn’t as important, because most likely, there will be restaurants or gas stations on a frequent enough basis that you won’t have to worry about water and food. For more off-road or backcountry-oriented riding, food stops are typically not an option, but water planning becomes paramount. For your first trip, I would recommend riding a semi-established local route, one that may have a forum or community of riders who you can consult for advice. Examples of some backcountry routes like this are the Ojai Rim Loop, Tour De Los Padres, or the Tahoe Twirl. All of these have routes posted online that have waypoints for campsites, food, water, and sometimes frequent updates for where water is flowing, and where it isn’t. Bikepacking.com also has an amazing repository for bikepacking routes around the world and I have linked it here. Spring is my favorite time to bikepack, at least in California, as the temps are often mild, and water tends to be flowing almost everywhere. Summer riding is always fun, but in the backcountry, you run the risk of showing up to a water spot only to find it dried out, leaving you SOL. With the aforementioned loops, even if they are nothing of interest for riding, I encourage you to explore the listed water stops and resupplies to get an idea of what good planning looks like for a ride.
The last piece of planning puzzle is the actual route planning itself. There are a bunch of different tools out there for this, but personally, I like to use ridewithgps. The free version of this tool offers some amazing features such as route planning, road and trail information, as well as waypoint creation tools to make your trip easier. To download routes for offline use, you need a subscription, and for your first trip, recommend this highly as it gives you some peace of mind in the case of a loss of service and some route confusion. Google maps is also a great option, as you are able to download map areas and waypoints for free! I won’t get into the specifics of how to use either of these route making tools, but I will link videos below for reference. Not a fan of using phone maps, I get it. Instead, you could simply pick up or print map for your route and draw out your route and add waypoints. Using Google Earth or Google Maps in the planning process helps a ton with this, and with the physical map approach, you can use the aforementioned, free-to-download, google maps and pins as a cross reference. This helps a ton if for example, you’re at a complicated fork in the trial, or you find yourself lost, as you can zoom an and double check where you want to go.
Concluding Thoughts
Well, there you have it. Hopefully this guide gives you a good idea of what to know, build, pack, eat, and plan in order to have a good time bikepacking. I have been so excited to see people exploring and enjoying this activity more over the years, and I hope this bit of writing offered some insight into why my friends and I love it so much. Good luck out there, and if you have any further questions, feel free to email them to thecuttycorner@gmail.com.